Creating Multipage SPA’s with AngularJs and TypeScript

Ok in the last post we created a really simple “Hello World” application using AngularJS and TypeScript. This was probably the simplest of apps we could write but it did give us a chance to introduce a number of key concepts. I’ll list them here.

• AngularJs bootstrapping
• AngularJs data binding
• Setting up Webstorm for TypeScript dev
• Building a basic controller.

So that’s great but we want to go further than this. Often when we build applications in technologies such as Java or .Net we use a number of different libraries/apis. In the last post we pulled in one such library (AngularJS) but we didn’t actually need to use any of its api and instead relied on the declarative features. Now we will go beyond that and dip our toes into parts of the api.

What’s a SPA?

The buzz word this year is SPA’s or Single Page Applications. If you haven’t come across this term yet don’t worry as it’s still quite new and will become more prevalent over the course of the the next few years. First let’s clear up some confusion about what SPA means as I think it can lead to some confusion. Although your app is called an SPA and does run inside of a single html page, that doesn’t mean that you’re limited to a very simplistic UI or that everything must be shown on screen at the same point.

You should look as SPA’s as the same way you would look at WinForms or WPF application. The “Single Page” part of the acronym is really just your application container or host. When you come to build your app you will see that you can actually have 100’s of pages/screens in a SPA. In the same way you add a new page/form to a WPF application running on a user’s desktop, you will see we do exactly the same for our SPA apps.

Create our host page.

Before we get into the creation of multiple pages and routing in AngularJS let’s talk about the host page first. In traditional .net apps when you start them there are a number of things happening. Two of the most important however is the loading of your custom dependencies, normally dll’s you’re are using as well UI initialization where you may be loading a custom theme which will be applied to your app (app.xaml).

You normally load these things upfront because they are core to the application and are often required to be available before your application code starts running. The same is true for SPA’s therefore we need a host page which will do this work for us.  Lets take a look at a really simple host for our application.


<html ng-app="myApp">
<head>
    <title>Multi-page SPA - Typescript and Angular</title>
    <link href="//netdna.bootstrapcdn.com/twitter-bootstrap/2.3.2/css/bootstrap-combined.min.css" rel="stylesheet">
    <script src="https://ajax.googleapis.com/ajax/libs/angularjs/1.0.1/angular.min.js" type="text/javascript"></script>
    <script src="app.js" type="text/javascript"></script>
</head>

<body>

<div>
   <div ng-view></div>
</div>

</body>
</html>

If we take a moment to dissect this html there are only a couple of things worth mentioning. First we are loading 3 dependencies into our app.

Bootstrap – An awesome CSS start kit from twitter which gives you out of the box theming for you application
• The AngularJS library
• app.js which is our application code.

The second is that we have an new AngularJs directive ng-view.

What’s ng-view?

If you look at the body of our page you will notice I’ve introduced a directive from the AngularJs framework called ng-view. The ng-view directive in angular is incredibly powerful. It works in conjunction with AngularJs’s routing provider and is used to inject fragments of HTML into the DOM where that directive has been applied. The best way I can think to describe this is to compare it to XAML construct, the ng-view directive being applied to the div essentially turns the div into a XAML’s content presenter control. So that’s our host page setup, I don’t need anything else for this demo in the host so lets move forward.

Enabling intellisense and type checking for AngularJs

As I mentioned the ng-view directive works in with Angulars routing provider in order to display content, but as it stands our application has no routes and we need to configure these for this to work. It’s now that we get a chance to play with the AngularJs api. As we are using TypeScript we can take advantage of one of its key selling points, the ability to pull in type definitions for any JavaScript library and provide us with full intellisense and type checking. These definitions are called ambient declarations and work similar to how c++ header files work.  There is actually a site which has many of the most popular definitions already defined for us, its called DefinitelyTyped 

I went to this site and downloaded the angular.d.ts file as well as jQuery and added it to my Webstorm project. NOTE: As d.ts files are purely definitions they do not get compiled into JavaScript which is why I do not need to reference the files in my host page. They are  there to support the tooling. 

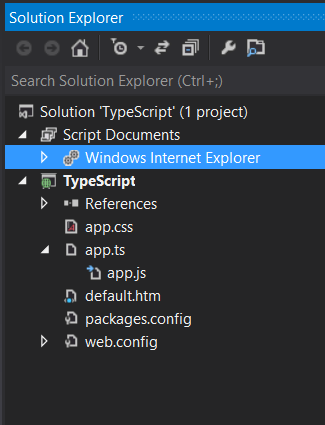
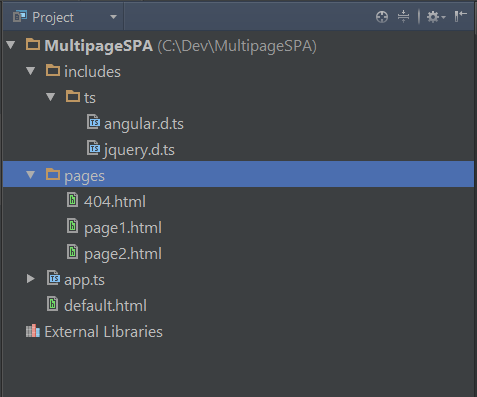
For the sake of simplicity I only want to have a couple of pages in my app as I think this illustrates the concept well enough. I would like page1, page2 and then when the user attempts to navigate to a page that doesn’t exist I’d like to show them a 404. So I have just added these to my project under a folder called pages. You can see what my final project structure looks like here.

multi-spa-1

Defining our routes

We now have our app setup with all the files we need, the last thing we want to do is define our routes and enforce the behavior I’ve specified. Let’s jump to the app.ts file and write some code.


/// <reference path="includes/ts/angular.d.ts"/>

var app = angular.module("myApp", []);

//Set up our site routes
app.config(($routeProvider) => {
    $routeProvider
        .when('/page1',  <ng.Route>{ templateUrl: 'pages/page1.html' })
        .when('/page2', <ng.Route>{ templateUrl: 'pages/page2.html' })
        .when('/404',  <ng.Route>{ templateUrl: 'pages/404.html' })
        .otherwise( <ng.Route>{ redirectTo: '/404' });
})

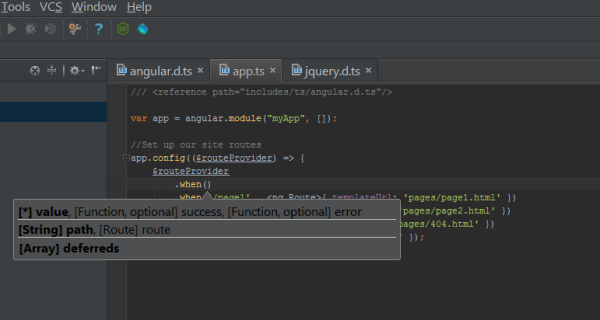
Ok breaking this code down, you can see the very first thing we do is to instruct the TS compiler and tooling that we want to import all the type definitions for AngularJs. This is what gives us full intellisense and type checking around the api.


/// <reference path="includes/ts/angular.d.ts"/>
multi-spa-2
Next we define a new angular module. Angular modules are really a way for you to break your application into composable chunks. We will cover this in more depth in a future post, for now just note that the name of the module matches the one we defined in our html host. We will be able to configure this module in the next step.


var app = angular.module("myApp", []);

The final piece in the puzzle is the definition of the routes. Using the config object which hangs of our module we can inject a $routeProvider. Don’t worry about how this gets injected just yet as we will cover AngularJs’s injection in a future post, just trust in the fact that you will be given a $routeProvider and that it’s this object we will use to configure our routes.


//Set up our site routes
app.config(($routeProvider) => {
    $routeProvider
        .when('/page1',  <ng.Route>{ templateUrl: 'pages/page1.html' })
        .when('/page2', <ng.Route>{ templateUrl: 'pages/page2.html' })
        .when('/404',  <ng.Route>{ templateUrl: 'pages/404.html' })
        .otherwise( <ng.Route>{ redirectTo: '/404' });
})

In the configuration you can see it uses a fluent API to define routes, specifically it uses “when” to define the rules of route and where it should go. We setup three routes for our page1, 2 and then our 404. The final thing we do is use the “otherwise” method define the fall back when no route has been found that matches the rules. In our case the 404 page.
At that point we are good to go, if we run the app and try different urls like default.html#/page1 or default.html#/unknown we can see the route provider is doing its job and taking us where we want to go. Now behind the scenes AngularJs is doing a lot of the heavy lifting for us, firstly it is monitoring the location of the url and when that changes it checking the list of routes that have been defined in order to see if we there is a matching rule, then if it finds a matching rule is downloads the template from the server (no they are not eager loaded) then once downloaded the ng-view attribute that we had in our host is injecting the html fragment into the DOM. There is tonne of stuff I’m leaving out here but that’s the gist of it.

Summary

You can now see in a very simple demo how we can build multipage SPA’s. The ability to dynamically load a screen into your SPA gives you a very powerful composition model, as we explore more about the AngularJs api you will see many examples of how this and other types of composition can help us build very complex ui. You can grab the code for this demo here.
Getting started with AngularJs, TypeScript and Webstorm

I’ve been working with TypeScript since it was released and I have to say I love it. Over the course of the last 9 months I’ve learnt a lot about the language as well as using it within a number of IDE’s and with lots of libraries. At work we are currently building a very large AngularJS + TypeScript application for a front office environment. I plan to blog some of the things I have learnt during this time.

AngularJS is an MVC/MVVM SPA application framework from Google. The project is open source and comes with a number of powerful features to help kick start you applications. These include powerful data binding, a templating engine, dependency injection, routing and the ability to extend HTML with your own custom tags which works across browsers.

I believe that AngularJS is probably the best framework out there at the moment for building your SPA’s. I have tried knockout and ember etc but Angular seems to have the most familiar features that I am used to as a .net/xaml developer moving back into the web world. In fact I’d go so far as to say that the Angular boys have taken quite a few tips from the WPF model.

Lets create the HTML

For the purpose of this post I am going to focus on building a hello world application in Webstorm. I originally started TypeScript using Visual Studio 2012 but as time has progressed I have found I have transitioned JetBrains tools.

So first up, if you want to use TypeScript in Webstorm you’re going to need 6.0+, so go download it and once stared create a new empty project in the location of your choice. Next up lets create a really simple screen, the html below, what we want is an input field, a button and somewhere to display the text to the user. This shown below.


<!DOCTYPE html>
<html ng-app>
<head>
    <title>Hello World - Typescript and Angular</title>

    <script src="https://ajax.googleapis.com/ajax/libs/angularjs/1.0.1/angular.min.js" type="text/javascript"></script>
    <script src="app.js" type="text/javascript"></script>
</head>

<body>

<div ng-controller="HelloWorldController">
    <div>
        <input type="text" ng-model="inputText" />
    </div>

    <div>
        <button ng-click="onDisplay()">Display me</button>
    </div>

    <div>
        <h1>{{displayText}}</h1>
    </div>
</div>

</body>
</html>

Ok everything is setup for us to get started, now first thing we want to do is pull in AngularJS. For the sake of this example I’m happy to use the cdn version which can be found here https://ajax.googleapis.com/ajax/libs/angularjs/1.0.1/angular.min.js.  After you have done this add a app.js to the head. We haven’t created this file yet but we will come back to that later.

Bootstrapping our app

AngularJs comes with a number of built extensions to html called directives which allow you to quickly build you app in a declarative way. The first directive we are going to look at is the ng-app directive. This attribute can be applied to your html tag and simply allows angular to know that there is an angular app in scope and that is should initialize itself.

If you run the app at this point you’ll see nothing happens, this because we haven’t actually written and code, as mentioned previously Angular uses an MVC pattern. Therefore to add behaviour to your app we are going to have to create a simple controller and bind it to the DOM somehow. To do this we use another angular directive called ng-controller. I’m not going to get into the details of the ng-controller directive right now but just know that it can be applied to any element and that descendants of this element will have access to a shared scope which the controller provides. We specify a controller name for the directive HelloWorldController. Angular will attempt to resolve this controller automatically when the app starts.

Data binding

The last things we need to do to our html page is to specify some data binding. If you’ve worked in WPF before you will find there are a lot of similarities. The Angular data binding engine is incredibly flexible, I’d say more so compared to wpf and implements a dirty checking algorithm for deciding when update the DOM. There is a great in depth post on stack overflow here.

In our little app we want to be able to capture the text that a user types into an input element. Normally in jquery we would have do some fancy event handling to manage all this however in Angular we have the ng-model directive which can do this nicely. This works by basically monitoring the changes to the input and when a change is received it updates the “scope” object to store the data.

Next we want display the result of the input value prefixed with “hello”. To achieve this we can use one of Angulars coolest features “expression binding”. Assume for the moment that our scope object (that we haven’t built yet) has a property called displayText. In order for us to inject that into the DOM all we need to do is use double curlies. {{displayText}}. I can’t stress how easy this is and also how much time you will save by not having to manually manipulate the DOM.

So now we are almost there, the last thing we want to do is add some behaviour to our display button so that when the use clicks the button the displayText is updated and shown to the user. To do this we have our final directive for this post ng-click. ng-click provides a commanding pattern so that we can invoked custom behavior easily. You can also bind to functions but that’s for another post.

The binding for ng-click is pretty simple, all we need to do is state what function we want to run when the button is clicked. Cool we’re all set……….LETS write the controller and make all this work.

Setting up Typescript compilation in Webstorm

It’s now time to get started with TypeScript, in Webstorm go to add a new file, you will see that typescript is now a supported option. Go ahead and add a app.ts file. At this point Webstorm will display a big green banner asking you if you would like to setup a file watcher to compile TS files in JS. Go ahead and click add watcher. Now it’s important to note here that you may not have TypeScript compiler installed on your machine. You can get the compiler a couple of ways, either download the installer from the TypeScriptLang site or run the node npm command to pull it down.  Once you have it on your machine just point Webstorm at that exe or bat file and Webstorm will do the rest.

Building our controller

As we mentioned previously we the ng-controller directive instructs angular to go look for a controller with the name we specified. So we can now build that controller in typescript. This class is really simple and should be self explanatory but what is important to note is that we are using TypeScript’s classes in order to provide our controller. Classes will be coming to JavaScript in ES6 but TypeScript allows us to use them now which is very cool. What is also very cool is that TypeScript classes get compiled into constructor functions which is exactly what AngularJS actually requires for its controllers. I’ve got the TypeScript code and the compiled JavaScript below for you to review.


class HelloWorldController{

    constructor(private $scope){

        $scope.prefixText = "Hello ";
        $scope.inputText = " ";
        $scope.displayText = "";
        $scope.onDisplay = () => {

            this.$scope.displayText = this.$scope.prefixText + this.$scope.inputText;
        };
    }
}


var HelloWorldController = (function () {
 function HelloWorldController($scope) {
 this.$scope = $scope;
 var _this = this;
 $scope.prefixText = "Hello ";
 $scope.inputText = " ";
 $scope.displayText = "";
 $scope.onDisplay = function () {
 _this.$scope.displayText = _this.$scope.prefixText + _this.$scope.inputText;
 };
 }
 return HelloWorldController;
})();

And with we are done, we have a simple “Hello World” SPA built in Typescript and AngularJs. You can grab the source for this post here.

In our next post we will look at how we can use the AngularJS API inside of TypeScript and get full intellisense support.

Unit Testing with Typescript and Resharper

UPDATE –  I have been unable to get this to work with newer versions of resharper, hopefully full support is on the way from Jetbrains. I’d recommend using Chutzpa in the interim 

As a c# developer there are a few tools which I cannot live without. Visual studio obviously (and VS11 is the best yet IMHO) and the other is Resharper. When I write my c# code I like to follow TDD principles and ensure my code is highly testable. These days if I don’t have tests around my code I feel very exposed when refactoring, it’s this safety net that I want to ensure I have in the TypeScript world too.

In my previous post where I tested out some of the features of the TypeScript language I built a small GA based decrypter which can be used to crack a simple code. However I had no tests around this class and going forward if I am to feel comfortable working in TypeScript I’m going to need unit tests. The good thing about Resharper is that while it handles the day to day C# development tasks with ease, it also has a wealth of functionality for web technologies including JavaScript programming. Looking in the options under Unit Testing we can see that Resharper supports two different JavaScript testing frameworks, Jasmine and QUnit. I looked this up and it appears Resharper supported QUnit since v6 and Jasmine from V7.

This is encouraging as it means that I should be able to run my JavaScript unit tests within the Resharper test runner as I do in c#. As an aside, Jasmine is a more BDD style testing framework compared to QUnit which I prefer and maps closer to NUnit which is what we use at work.

In Visual Studio I created a new TypeScript project and copied my Decrypter class into a libs folder. I also created a new Tests folder where I added another new class called DecrypterTests which is where I will add all more tests. Now as I want to target QUnit for my testing I needed to understand the QUnit API. On their website it shows a very simple example of what it takes to create a QUnit test. Only two method are needed from the api those being “test” and “ok”.

test( "hello test", function() {  ok( 1 == "1", "Passed!" );});

Seeing as I want to work with QUnit in TypeScript and have full intellisense and static typing I need to create a TypeScript definition file. Definition files are a way for JavaScript library authors to create a separate file to their js library which applies static typing to the api. This static typing “evaporates” at compile time and resulting JavaScript is not impacted. As QUnit does not currently have a TypeScript definition file I manually created one in my project which covers the two methods I want to use.

declare module test {
    export function (description: string, method: Function): void;
}

declare module ok {
    export function (condition: bool, error: string): void;
}

You can see that there is not much to the definition file. When you add a definition file in TypeScript you are supposed to add a “.d.ts” in order to clarify that this has no implementation. Now I should have all the pieces in place so that I can write a test for my Decrypter class.

The method I want to write a test is the GenerateRandomKey method which is supposed to create random key which is 50 chars long. In order to test this functionality I now need to import 3 references into my test file. Firstly the TypeScript file for my Decrypter class, then its compiled JS file, and finally a reference to the QUnit definition file I created.


///<reference path="../libs/Decrypter.ts" />
///<reference path="../libs/Decrypter.js" />
///<reference path="../libs/qunit.d.ts" />

You may notice that I haven’t included a reference to the QUnit.js file. This is because Resharper handles this for us by references the file automatically when it goes to run the tests. Therefore we can just omit the references.


test("Decrypter Library - GenerateRandomKey", ()=> {

    //Arrange
    var decrypter = new Decrypter();

    //Act
    var key = decrypter.GenerateRandomKey();

    //Assert
    ok(key != null, "The key should not be null.");
    ok(key.length == 50, "The key lenght should be 50 chars long.");

});

After we have the correct references we can go about writing our test. This case is dead simple but illustrates the point. The QUnit.d.ts file provides me with full intellisense and type checking. The only thing left to do is run the tests to make sure they pass. I can do this in Visual Studio by right clicking on the “Tests” folder and choosing “Run Unit Tests”. Resharper automagically finds the QUnit tests and executes them.

So now we have the ability to write unit tests in TypeScript that target our TypeScript code and executing them inline without jumping back to JavaScript.

Hope this helps,

Decompiling Windows 8 Apps

So you’ve got Windows 8 install and all these cool news apps that you can download but  you want to learn more about how Microsoft writes its JavaScript apps or maybe you want to understand how secure your app code is?  Well here is a quick guide to gaining access to an apps directory and having a nose through all that interesting information.

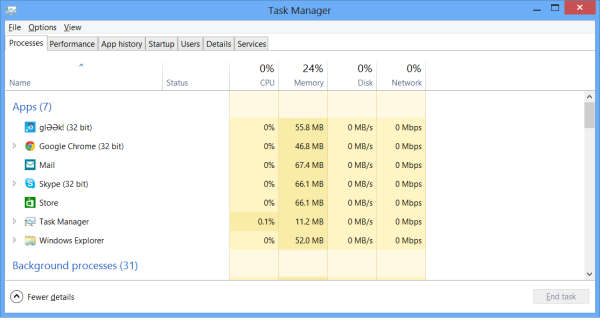
For the sake of this post I will decompile Microsoft’s own live apps which are written in both JavaScript and some .net. The first thing we need to do is find out where these apps actually reside on our system.  And easy way to do this is open up task manager and find an app that runs inside of metro.  These are normally shown as “Suspended” when you’re in desktop so that makes them easier to find.

As you can see in my list of apps I have the Mail app running.  If select the mail app and then right click and choose “Open File Location”  I find that I am blocked by permissioning.

Ok so that seems right, Microsoft don’t want me looking at all their code so I will have to do a little more to gain access.  Of course I know I should have access as I need to run the apps so at the very least I should have read access.

If we look at the “Details” tab on task manager you will notice that the mail app is is nowhere to be seen.  This is in part due to the way Windows 8 runs JavaScript apps but also in part due to how the app has been built.   JavaScript apps running in Windows 8 require a container in order to execute. Basically it needs access to IE in order to perform rendering etc. Therefore Microsoft have created an exe called “WWAHost.exe” which hosts these kinds of apps.

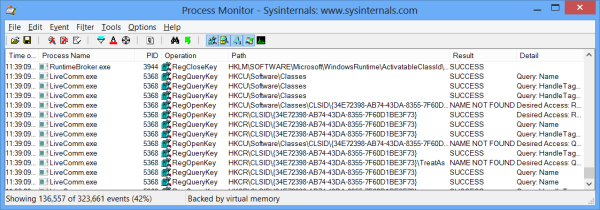
That said we are not even 100% sure that the mail apps and people apps etc run in the container.  Therefore its back to our old friend process monitor in order to see what’s going on when we run the apps.   After a quick capture I can see that when running the Mail app there is a lot of activity in the process LiveComm.exe.

If I look at the process information for one of these entries I can find the location of where this process is actually running.

Ok that looks promising, taking the location of the exe and popping into explorer I can now browse directly to the folder and see its contents.  As expected this looks like the apps execution directory and we can see all the files for each of the common “Live” apps.

Now all you need to do is go browsing through the js files to learn how to develop your apps with the same way Microsoft has or dig our reflector for .net stuff.

You should be able to use this approach for most types of apps.  Obviously C++ apps will probably be the most secure when it comes to decompilation.  Also note, you cannot change any of files as all assets etc are digitally signed and will be checked when you try and run them in Windows8.

Happy hacking

Cracking a problem with TypeScript

Last week Microsoft announced TypeScript. A new JavaScript superset which adds static typing annotations as well as language support for classes and modules to the JavaScript language. As a C# developer since the .net 1.0 beta days, you can imagine I am pretty comfortable in a static languages and while that is fine most of the time the trend is for more apps to run in the browser. This normally involves me dusting off my JavaScript skills and entering back into the wild work of dynamic scripting.

It is this wild world of the future where HTML5 apps which run in the browser is where TypeScript should offer a lot of help to application developers. The concept of making coding in the browser easier is not a new one and languages such as CoffeeScript and Dart are showing that devs have an appetite for it. Both of the aforementioned languages have tried to tackle the problem in different ways, but what I like about TypeScript is that it is not trying to abandon JavaScript but instead apply a level or rigor to it that hopefully will become standards compliant in the future.

With all that in mind, I decided to build a little sample app to test out some of the features. Before you get started you will want to download the Visual Studio plugin to help with the development of your app. Also I recommend having a read through the TypeScript spec which has a wealth of information on what features the language offers. The app I decided to build was a little code cracker which is based on a Genetic Algorithm. This is not a very advanced implementation of GA as the fitness function and mutations are not very sophisticated. However is does give me the level of complexity I needed to test the language out.

The problem

In my app I wanted a simple ui where someone could enter a numeric code of 50 chars which I would then attempt to crack. Using a population of random keys to start with, each key’s fitness needs to be tested against the crack key, the strongest key based on fitness is the only survivor and its DNA becomes the basis for the next generation. Each generation has a mutation factor of 10% which ensures that the key should evolve over time an eventually the 50 char crack key will be found. Below is an example of my UI and my typescript code to run the algorithm.

$(Document).ready(() =>
{
    var decryper = new System.Crytography.Genetics.Decrypter();
    var crackButton = $("#crackCodeButton");
    $("#inputCodeBox").val(decryper.GenerateRandomKey());

    crackButton.click(() =>
    {
        var code = $("#inputCodeBox").val();
        var processingStatusElement = document.getElementById("processingStatus");
        var decryper = new System.Crytography.Genetics.Decrypter();

        decryper.Decrypt(code, processingStatusElement);
    });
});

Importing Libraries

This first thing you can see in this code is that I am using the JQuery library from within TypeScript. This is a fundamental design decision from the TypeScript team, in that any JavaScript library can be consumed within typescript with no changes required. What is also cool is that any JavaScript library currently out there can have an additional typing annotations file (think C++ header file) which a developer can import into their TypeScript project and start to work with the library in type safe way. This static typing on the api is one of the major benefits of using TypeScript IMHO.

Currently if a JavaScript library makes breaking changes to its api these changes can be very difficult to pick up in your code using tests alone. TypeScript will make this positively easy. A further benefit is that none of this typing information is outputted or checked in your JavaScript code which makes the resulting JS closely match your TypeScript. This I believe is an advantage over CoffeeScript and Dart for example which the resulting code can be vastly different from your source.

Namespaces, Classes and Interfaces

Next up I wanted to see how in TypeScript we can build hierarchical api’s with all the richness that we get in .net. Again I am no l33t JavaScript programmer so how you go about building hierarchical apis currently I am not sure but my hunch is that it cannot be done. I see a lot of people simulating OOP concepts like inheritance using protypes etc but all of these to me feel like hacks.

In TypeScript the designers have set about designing a language that they hope will fall inline with the emerging ECMAScript 6 standards. While there are no guarantees, I think this is a good strategy and one that shows their willingness to make TypeScript the most open of all the higher level browser languages. To support hierarchical namespaces in the language developers can use modules which allow classes and interfaces to be grouped under a logical area. In my sample I created a fake namespace using dot notation which TypeScript supports. One cool thing to note about modules is that you can define them across files, and the TypeScript compiler is smart enough to locate them all and show all your classes in the visual studio intellisense.

module System.Crytography.Genetics {

    interface IDecrypter {
        Decrypt(code: string, statusElement: HTMLElement);
        GenerateRandomKey(): string;
    }

    export class Decrypter implements IDecrypter {

        public Decrypt(code: string, drawingPanel: HTMLElement) {
        }

        private GenerateKey() {
        }

        private CheckFitness() {
        }

        private CreatePopulation() {
        }

        private GenerateMutatedKey(currentkey: string): string {
        }

        public GenerateRandomKey(): string {
        }
    }

}

In the code above you can see that I have defined a simple module with and interface and class for my Decrypter. What’s great about this is that interfaces become a first class citizen within TypeScript which means you build the appropriate levels of abstractions and code to contracts. A lot of the semantics of defining classes and interfaces from c# translate well into TypeScript and other than a few naming issues I found creating interfaces, inheriting them and defining functions and constructors etc to be very familiar. Full TypeScript code below if you’re interested in the detail

module System.Crytography.Genetics {

    interface IDecrypter {
        Decrypt(code: string, statusElement: HTMLElement);
        GenerateRandomKey(): string;
    }

    export class Decrypter implements IDecrypter {
        private _code: string;
        private _keyGenerated = false;
        private _workingKey = "";
        private _fitnessLevel = 0;
        private _keySize = 50;
        private _population = new Array(5);
        private _mutationPercentage = 10;
        private _drawingPanel: HTMLElement;
        private _generations = 0;

        public Decrypt(code: string, drawingPanel: HTMLElement) {

            var start = new Date().getTime();
            this._code = code;
            this._drawingPanel = drawingPanel;

            while (!this._keyGenerated) {
                this.GenerateKey();

                this._keyGenerated = this._workingKey == this._code;
            }

            var time = new Date().getTime() - start;

            this._drawingPanel.textContent = "It took " +
                time / 1000 + " seconds to decrypt the key.  Generation Count: "
                + this._generations;
        }

        private GenerateKey() {
            this.CreatePopulation();

            this.CheckFitness();
        }

        private CheckFitness() {

            this._generations++;

            for (var i = 0; i < this._population.length ; i++) {
                var keyFitness = 0;
                var key = this._population[i]

                for (var j = 0; j < key.length ; j++) {                     if (key.charAt(j) == this._code.charAt(j)) {                         keyFitness++                     }                 }                 if (keyFitness > this._fitnessLevel) {
                    this._fitnessLevel = keyFitness;
                    this._workingKey = key;
                    this._drawingPanel.textContent = keyFitness
                        + " of " + this._keySize + "chars found";
                }
            }
        }

        private CreatePopulation() {
            for (var i = 0; i < this._population.length ; i++) {
                var key = "";
                if (this._workingKey.length == 0) {
                    key = this.GenerateRandomKey();
                }
                else {
                    //Ensure strongest candidate survives.
                    if (i == 0) {
                        key = this._workingKey;
                    }
                    else {
                        key = this.GenerateMutatedKey(this._workingKey);
                    }
                }

                this._population[i] = key;
            }
        }

        private GenerateMutatedKey(currentkey: string): string {
            var newKey = currentkey;
            var charChangeCount = (currentkey.length / 100) * this._mutationPercentage;

            for (var i = 0; i < charChangeCount ; i++) {
                var index = Math.floor(Math.random() * currentkey.length);
                var newChar = Math.floor(Math.random() * 10).toString();
                newKey = newKey.substr(0, index) + newChar + newKey.substr(index + 1);
            }

            return newKey;
        }

        public GenerateRandomKey(): string {
            var key = "";
            for (var i = 0; i < this._keySize ; i++) {
                key = key + Math.floor(Math.random() * 10).toString();
            }

            return key;
        }
    }

}

.Netters will feel very comfortable

The language often feels like a blend of C# and Visual Basic. Little things crop up as you work with the language such as the way the “var” keyword behaves, mimicking the c# one with type inference. Also it helps that all the curly braces are in all the right places which is what you would expect from a c-based language. “Implements” for example is the keyword you use to inherit an interface which can map back to Visual Basic. Best of all however is that “Fat Arrow” “() =>” is supported so you can avoid the verbosity of “function”. I wonder if the design team made a conscious effort to do this or if it just naturally fell out. That’s said however, there are obviously enough differences to make TypeScript distinctly separate from both C# & VB.

Conclusion

Overall I found using TypeScript extremely satisfying and I am excited as to what the future hold for the language. We already know that they intend to support Generics. But long term could we see statically typed versions of LINQ, RX etc. Also the tooling I can see coming on leaps and bounds. I have already heard mutterings on twitter of TypeScript support from JetBrains which would be awesome!

If you want to try the app you can find it here.  Two words of caution however,  I only tested on IE10 and also I block the UI thread while performing the computation.  Yeah yeah I know……………..shoot me! 🙂

Windows phone 8 to support chat rooms?

More digging into the emulator images for wp8 has thrown up more interesting finds that should be coming to the platform come the end of this yeat.  This time it looks like Microsoft has some interesting plans for the already cool “groups” functionality.

Digging through the resource files I have numerous mentions to “rooms” being supported.  From what I am gathering this feature would be an addition to the groups functionality whereby you should be able to add a group of your friends to a chat room and all chat live.  Super cool!

This resources are used by the contactsres.dll in system32 and I have a couple of snippets for you below.

Gather your friends and family together. Invite them to a private Room where you can share a calendar, photos, group chat and notes. Or add them to a Group to see social updates from just those folks and text them all at once. Tap the plus sign to get started.

This room will be deleted. You can create a new room in the People Hub.

1 people left the room

Room membership has changed

I must admit this feature sounds awesome and if it turns out to be true fits perfectly in-line with windows phone being the premier social networking phone.

Will WP8 have new parental control features?

Been looking over the WP8 emulator images today and came across this interesting resource string.

The My Family settings for your account prevent you from downloading this item. Your parent can manage My Family settings at windowsphone.com.

This resource string found in the common mobile UX resources seems to suggest that a new feature called “My Family” will be coming to WP8.

WP8 SDK Silverlight Alive!……XNA Dead……Native XAML gone missing!

I suppose you guys have heard that the windows phone 8 SDK has leaked. Well I decided to download the bits and have a quick look around.  This  post is really just summary of some interesting observations I made.  If you want to download the bits yourself you will have to hunt around. I found it on on a torrent site and had good seeding.

Where is the winRT support? 

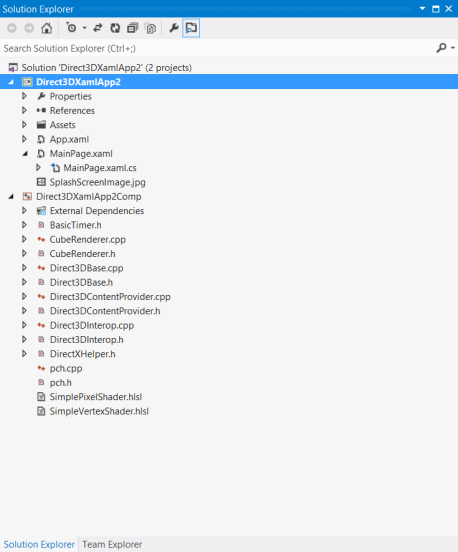
One of the first things I did once I had installed the SDK was to run up Visual Studio 2012 and see what projects types were available.  What caught my eye was the fact that there appears to be no “Metro style” or “WinRT” project templates installed.  The naming of the projects is pretty much the same as the 7.5 SDK. I’m sure that’s a good thing as you don’t want to confuse people right? Below is a screenshot of the project picker.

You can see I have highlighted a new project type which never used to exist in the 7.5 SDK.  I’ll come back to that shortly.  As winRT tech does not seem to be obviously visible in the project list it seems I will have to dig a little deeper.  Lets see if creating a standard “Windows Phone Application” will provide more detail as to what’s going on in this new release.

new apps for WP8 wont be running on winRT aka native xaml but instead managed xaml

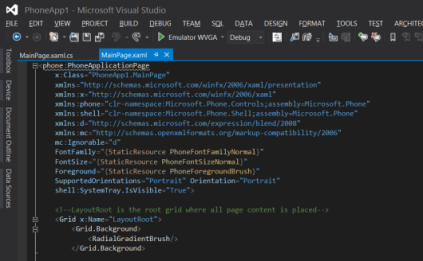
Well that’s a turn up for the books.  From what I can tell these new apps for WP8 wont be running on winRT aka native xaml but instead managed XAML.  To me that looks like standard CLR namespaces being imported and therefore is managed code. Also it seems I have classes that aren’t available in winRT such as RadialGradientBrush. Digging out jetbrains dotpeek proves exactly that, the whole runtime is silverlight.

This raises a couple of questions, firstly why did Microsoft put so much effort into creating native XAML and then not adopt it for WP8?  Secondly what does this mean for developers wishing to develop across 3 screens?

The first question I think is easily answered, it is likely to be timing issue. With the monumental effort to get Windows 8 ready for its October release there probably hasn’t been time to migrate the winRT tech & tooling to WP8. Further, developers who have already created apps on the platform do not want to have to rewrite them for winRT.  Especially as winRT is equivalent to Silverlight 2.0 at the mo and would lead alot of gaps.

 If you’re a html5 developer building apps for winRT and you want to port them to WP8, well you are royally screwed at the moment

The second question is difficult.  It seems the one dev platform for all screens is not here yet. Although porting code is possible it’s not going to be smooth given the current situation. If you’re a html5 developer building apps for winRT and you want to port them to WP8, well you are royally screwed at the moment.

One last point on this, it seems C++ devs get a raw deal as they wont be able to leverage XAML on WP8.  Well not until winRT arrives.  From what we have heard from Microsoft, the key deliverable for this release was about providing native code access.   This is so that all those game developers who need to extract every cycle of  performance out of platform can do so.  It will be good to see popular games from iOS transitioning quicker to WP8.  But that leads to the next topic….

What’s the deal with XNA? 

Well I think with WP8 SDK I think you can official say goodbye to XNA.

One of the other big questions hanging over the the future of WP8 was what’s happening to XNA.  Well I think with WP8 SDK I think you can official say goodbye to XNA.  In this new SDK you only seem to be able to create XNA games that target WP7.1. If you want to use XNA in WP8 then it seems you are out of luck.

But the story gets a little worse than that,  if you remember in my screenshot above I highlighted a new project type called “Windows Phone Direct3D XAML Application”.  Well the good news is that this project can target WP8, however on creating one of these projects your actually going to be developing your game in C++.  The project is set up with a simple c# xaml app with a DirectX drawing surface, then all your access to DirectX must be written in native code.  I can’t see XNA coming back from this personally but hey, you never know. Microsoft are anything from consistent these days.

All in all this leak is a bit of mixed bag, while the WP8 platform looks to be getting some cool new features the dev story is a mixed one.  A few bullet points below for the guys that don’t want to read my waffle above.

  • Managed xaml lives on in WP8
  • winRT is nowhere to be seen
  • 3 Screens development story not being realised in this release.
  • Native code now available on the platform
  • XNA is left out of the WP8 party
  • If you want to build games then dig your C++ book out

Coding challenge: Reading an LCD display

If you read my previous post “Coding challenge: Creating an LCD display” then you will remember I was set a challenge by a friend of mine to create a function that would take an integer and produce a LCD display inside of a console window.

Well I got a follow up challenge from him this week which went like this.

This week’s kata is simply the inverse of last week’s … instead of taking a number and producing a “LCD display”, the task this week is to accept an LCD display and produce a number.  Numbers will always be 3 lines high and 3 characters wide: The easy version: accept a single digit in a single and return the numeric value. The harder version: accept a multi-digit display and return the numeric value.

So with the challenge set it was time to attack the problem.  Again the real difficulty that presents itself in this challenge is the fact that the data must be read line by line.  Therefore you must track the pattern of each digit as you move down through the data and only once you have that data can you start to make some decisions.  First however I still set myself some base rules for this challenge. I have listed them below.

  • All numbers through 0-9 must be matched.
  • Each number must be easily encoded in order to compare with the input data.
  • Extracting the number of digits from the input data can be worked out given the fixed size of the challenge.
  • Each digit being pattern matched must be encoded in the same way as the list we will compare against.
  • We will need to avoid the blank lines in the data.

Given all these, here is my code below. Lucky for me I could seed my function by using the draw method from previous post so made it easier to test.

First I created a unique encoding of all the numerals from 0-9 using a simple read of each line and concatenating the strings together.  This pre-computer value saves time and should be easy to compare against.

        private static Dictionary<string, string> GetMatchPatterns()
        {
           return new Dictionary<string, string>
                        {
                            {"0", " - | |   | | - "},
                            {"1", "     |     |   "},
                            {"2", " -   | - |   - "},
                            {"3", " -   | -   | - "},
                            {"4", "   | | -   |   "},
                            {"5", " - |   -   | - "},
                            {"6", " - |   - | | - "},
                            {"7", " -   |     |   "},
                            {"8", " - | | - | | - "},
                            {"9", " - | | -   | - "}
                        };
        }

And below is the main Read method that actually does the pattern matching.  It’s fairly concise this time round.

        private static string Read(string number)
        {
            var patterns = GetMatchPatterns();
            var stringReader = new StringReader(number);
            var line = stringReader.ReadLine();
            var nCount = (line.Length / 4) + 1;
            var chars = new string[nCount];

            while (line != null)
            {
                for (int i = 0; i < nCount; i++)
                {
                    var currentPos = (i * 3) + i;
                    var data = new string(line.Skip(currentPos)
                                               .Take(3)
                                               .ToArray());
                    chars[i]= chars[i] + data;
                }

                line = stringReader.ReadLine();
            }

            return chars.Select(c => patterns.First(kc => kc.Value.Equals(c)).Key)
                        .Aggregate((a, b) => a + b);
        }

Performance seems good with rendering of the LCD representation of 1234567890 in around 140 ticks.

Stack vs Heap

So in relation to my last post on the LCD coding challenge.  A few more examples came up for solving this kata.  As we were discussing memory and speed etc I casually stated

Well if you convert all you classes to structs then that should make things faster.

I’ve heard this a lot but it occurred to me that I have never really tested the theory.  Also I couldn’t answer the question on everyone’s lips which is how much faster.  Therefore I put a quick spike together to test this and below are the results.

    class Program
    {
        static void Main(string[] args)
        {
            Console.WriteLine("Testing creating 100,000,000 heap objects");
            for (int j = 0; j < 10; j++)
            {
                var stopwatch = new Stopwatch();
                stopwatch.Start();
                for (int i = 0; i < 100000000; i++)
                {
                    var person = new PersonClass();
                }

                stopwatch.Stop();
                Console.WriteLine(string.Format("Elaspsed ms: {0}", stopwatch.ElapsedMilliseconds));
            }

            Console.ReadLine();
        }
    }

    public class PersonClass{}

    public struct PersonStruct{}

And below is the summary of the results.  I create 100 million class heap objects and the same number using structs.  I run this in a loop 10 times.

Testing creating 100,000,000 heap objects
Elaspsed ms: 850
Elaspsed ms: 824
Elaspsed ms: 820
Elaspsed ms: 809
Elaspsed ms: 825
Elaspsed ms: 850
Elaspsed ms: 809
Elaspsed ms: 803
Elaspsed ms: 793
Elaspsed ms: 794
Finished!

Testing creating 100,000,000 struct objects
Elaspsed ms: 255
Elaspsed ms: 248
Elaspsed ms: 246
Elaspsed ms: 251
Elaspsed ms: 244
Elaspsed ms: 245
Elaspsed ms: 245
Elaspsed ms: 248
Elaspsed ms: 244
Elaspsed ms: 246
Finished!

As you can see creating the structs are way quicker as we are no longer allocating memory on the heap and are avoiding putting pressure on the GC.  Based on this non-scientific test we would average over 3 times quicker. 

Moral of the story, if you need to create a lot of simple throw away objects in memory and you want the best performance then consider converting your objects to value types.